
- May 3, 2018
-
StudioBridge
- Studio Marketing
"Studio Marketing."
Chances are when you see/hear that phrase, you feel uneasiness, stress, or even fear. Let’s face it… as a studio owner you’re spending 50+ hours per week making sure your current student families are well cared for, your teachers are happy teaching for you, your bills are paid, your students are paying the correct amounts and your teachers are being paid correctly. You’re probably doing some teaching yourself, balancing budgets and projections, managing inventory, managing staff… The list goes on and on. Studio marketing is probably one of the last things on your mind, when in reality it should be one of the first.
Candidly, it is difficult to manage the operations of a studio AND worry about getting the word out about your studio through studio marketing. Enter online marketing and specifically, Facebook marketing. Year to year Facebook marketing is becoming both more efficient and effective. You can now know who’s coming to your website, signing up, and eventually can create a “lookalike” audience to advertise to based on those same people. And you can set all of this up within just a few minutes.
![]() Why Facebook studio marketing? After talking with several people I trust and know to be very knowledgeable in online marketing industry, I keep hearing two things that separate Facebook from others..
Why Facebook studio marketing? After talking with several people I trust and know to be very knowledgeable in online marketing industry, I keep hearing two things that separate Facebook from others..
1) It’s cheap. For a few dollars, Facebook can get you in front of hundreds, possibly even over a thousand specifically targeted people (if FB users “like” the post, etc). For a dance studio owner or music studio owner like yourself, who are probably marketing to a specific 15-30 mile radius, this is a huge plus. You don’t have to spend tons of money in order to reach many people in your surrounding areas.
2) You can be incredibly specific in terms of your studio marketing audience. Facebook allows you to create a custom audience where you’re targeting groups of people based on their age, gender, geographic location, interests, etc. In addition, you can install a Facebook pixel onto your website, in order to track all web traffic coming through. This will allow you to do 2 very important things when running an ad..
-
- First, you can run ads to the specific people who are viewing your page. Pixel does this by tracking the IP address of every computer that visits your page. We’ll get into this more later, but obviously if only 1,000 people have visited your page, you’re only going to be running your ad to those 1,000 people. The good part is, once you’ve been tracking IPs for 3-4 months, you very well could have thousands of people on that particular list to run an ad to, AND you can save that list and run ads to them in the future.
- Second, you can run ads to a “lookalike” audience that is based on the very person who has viewed your website. When you create this audience, it will pull up millions of people who match your viewers. You can then narrow that down in the ways we already talked about (age, gender, location, interests, etc).
That is why Facebook studio marketing for dance and music studios is becoming so popular!
So, let’s talk specifics about how to set up your studio marketing through Facebook. To really utilize Facebook marketing well for your music studio or dance studio, here are the exact steps you'll need to take:
- Create a Facebook pixel ID.
- Embed the pixel ID into your website’s code.
- Create your Business Manager in Facebook
- Generate some content to drive people to your website
- Create a custom “lookalike” audience based on who’s coming to your site
- Begin running Facebook ads using “Power Editor”
 Step 1: Creating a Facebook pixel ID.
This is a very easy step. You simply go to the Facebook pixel tab in your “ads manager” and select “create a pixel”. Once you’ve selected a name that represents what you do and you agree to the terms, you’re all set!
Step 2: Embed the pixel ID into your website’s code.
This sounds tricky, but it can actually be quite simple if you’re using specific platforms. Popular third party website platforms such as Squarespace, Wix, WordPress, LeadPages and Weebly make this easy to do. Or, use StudioBridge Websites and our team can handle it for you!
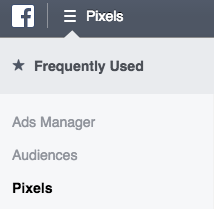
![]() To get started with your studio marketing through Facebook, you’ll need the pixel ID. To locate, navigate to your “Ads Manager”. Select “Ads Manager” at the top left hand side of the page, and select “Pixels” from the dropdown menu. Once you’re on the “Pixels” page, select “Set up Pixel”. You’ll immediately choose how you will want to install your code. Unless you’re using something like Shopify, Big Commerce, Segment, Magento, etc, you’ll need to select “Copy and Paste the Code”.
To get started with your studio marketing through Facebook, you’ll need the pixel ID. To locate, navigate to your “Ads Manager”. Select “Ads Manager” at the top left hand side of the page, and select “Pixels” from the dropdown menu. Once you’re on the “Pixels” page, select “Set up Pixel”. You’ll immediately choose how you will want to install your code. Unless you’re using something like Shopify, Big Commerce, Segment, Magento, etc, you’ll need to select “Copy and Paste the Code”.
![]() A new pop up with show on screen allowing you to “Install Pixel Base Code”. If you look under “1.2”, you’ll see some blue numbers in the code (that’s your pixel ID). You’ll need to select the code (which copies it to your clipboard), paste it somewhere and then copy the numbers that were in blue. NOTE: once you copy the numbers that were in blue, you’ll want to paste them somewhere and save them for future reference.
A new pop up with show on screen allowing you to “Install Pixel Base Code”. If you look under “1.2”, you’ll see some blue numbers in the code (that’s your pixel ID). You’ll need to select the code (which copies it to your clipboard), paste it somewhere and then copy the numbers that were in blue. NOTE: once you copy the numbers that were in blue, you’ll want to paste them somewhere and save them for future reference.
Once, you have your code copied, you can go to your platform to follow through with embedding this into your website. If using any one of the third party platforms mentioned above, this process is pretty simple and well laid out. Click HERE to find specific instructions for your platform.
Once you’ve completed these steps, your pixel is all set, and you can begin to track your audience!
Step 3: Create your Business Manager in Facebook
This step is fairly simple as well. Assuming you have a page for your business set up, all you need to do is input a few bits of info and you’ll be all set. First, navigate to business.facebook.com, click “Create Account”, and follow through the prompts.
Step 4: Generate some content to drive viewers to your website
If you already have a blog, you probably have many weeks worth of good content to share. If not, it’s time to get working on it and make a commitment to your studio marketing! This content can be videos, PDFs, etc. The idea is to think about who you believe your audience is, and teach or show them something really insightful for free. The ideas are endless!
If you’re a dance studio, teach part of a particular dance routine you’ve been teaching your students, or talk about best dancing practices. If you’re a music studio owner, teach how to play a popular song, or write about the best ways to play faster, or whatever the case may be. It really is all about who your audience is, and then giving them something (if at all possible) that is so valuable, they’re left saying, “I can’t believe I’m getting this for free!”
Step 5: Create an Audience: Saved, Custom or Lookalike
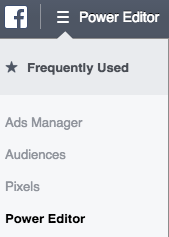
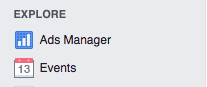 Now it’s time to create an audience and get moving! You’ll first want to navigate to the Facebook home page, and on the bottom left hand side, you should see “Explore”. Under that heading is where you’ll find “Ads Manager”, which is where you will create and run your ads.
Once you select “Ads Manager”, you’ll be taken to kind of your “dashboard” for ad manager. You’ll be able to view how much you’ve spent on your ads, see the “campaigns” you’ve run, track your results, etc.
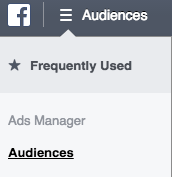 What you’ll want to do now, is select the 3 horizontal lines to the right of the Facebook logo in the top left hand corner of the site. At that point, a drop down menu will show, and you’ll want to select “Audiences”. This is where you will create custom audiences.
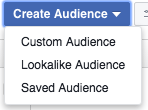
Once on this page, you’ll see “Create Audience”... Your first option would be to select and then click “Saved Audience”. A “Custom audience” can only be created from web traffic, a customer file of emails (which is amazing), or people who’ve already engaged with your posts on Facebook. A “Lookalike Audience” is created from an email list or has been tracked via pixel. But first, I’d like to get into what a “saved audience” looks like.
Once you select “Saved Audience”, you can create what you believe to be your target audience. As mentioned before, you can narrow down based on many different factors. If you’re targeting locally, the potential reach in terms of people reached should probably be less than 10,000 (you can identify your potential reach in the upper right hand corner of the screen). If you have too much more than that amount of potential reach, chances are you’re not narrowing your audience very well. You do want to reach lots of people, but more than that, you want the people that you reach to do something with the information, and for it to be something they’re interested in.
 Your second option, would be to go the “custom audience” route. A “custom audience” is created from a customer file, website traffic (IPs you’re getting from your web pixel) or who’s engaging with your page on Facebook. With a customer file, you can import your emails into Facebook and create an audience based off the matches. Basically, if anyone in your email list has a Facebook profile, you will then be able to advertise directly to them, by creating this audience.
As mentioned above, another way you can create a custom audience is through your website traffic. (You can view your pixel activity by click the 3 horizontal lines at the top left of the screen next to the Facebook icon, and selecting “Pixels”) This would be those IP addresses you’re capturing through pixel. You can market directly to the same people who’ve been to your website. The cool aspect with this, is that you can tell pixel to track all of the people who come to your site over the last 180 days. Once those 180 days are up, you’ll want to save that audience and then create a new audience where pixel will essentially do the same thing.
The last option within your custom audience is to create an audience based on who likes your page. This is the least effective until you experience some growth. However, if you do have many people who like your page, these are the people that you know REALLY like what you do, and they’re likely to take the most action because they’re already fans of yours.
Your third and final option when creating an audience would be to create a “lookalike audience”. This audience, much like the custom audience, is based on an email list, web traffic, etc. However, the difference here is that you can create audiences that are hundreds of thousands if not millions of people strong, who are very similar to your customers on your email list, or are similar to the people who’ve come to your web page. This obviously allows for more regional marketing, instead of local, which may not be something you need. However, if you are considering expanding to open a second location, or anything of that nature, this will be extremely helpful!
Step 6: Begin your studio marketing by running Ads using Power Editor
Once you have some audiences saved (or even if you don’t - we can do that later), now it’s time to create and run an ad to kick your studio marketing off! The way you’ll want to do this is by clicking those 3 lines at the top left again and then selecting “Power Editor”.
 Through Power Editor, you’ll be able to create and save campaigns, ad sets and ads. Each campaign you can create and house multiple ad sets and ads. In your campaign section, you can tell Facebook what you’re trying to gain from this ad. If your goal is to get people to your site, “link clicks” would be your best option. If you’re trying to get people to your site to register for something or buy something, maybe “website conversions” would be your route. Or if you’re trying to reach people in your area, “local awareness” could be your objective. Whatever you would like to accomplish, Facebook has a way of advertising to the people who will get that result for you the most often, which is pretty amazing.
Next is your ad set. Your ad set is who you’re targeting, how much you would like to spend on an ad and how long you’d like the ad to run. You can use a Saved Audience to begin to create an ad set, and then even narrow further with other factors. When creating your ad set, you can decide how long you’d like your ad to run in the “Budget and Schedule” section of the ad set. When thinking about your budget, be sure to have in mind how long you’d like your ad to run. If, for instance, you’re running an ad for 1 month, there is a minimum amount you can spend over that time. The more you spend, the further the reach. But, play around with the amount (you can select daily or lifetime) a bit to see where the minimum is, and then decide on a healthy amount for you.
![]() Down at the bottom of the “Budget and Schedule” section, you’ll see “Ad Scheduling”. Click “more options”, and when you do, you’ll see that you have ability to run your ad on a schedule or all the time. This can be a very cool feature, because you can tell your ad to only run certain hours of the day by choosing to run on a schedule. In general, ads typically do better after 6AM and before 11PM, so you might want to consider running yours in a similar time frame.
Down at the bottom of the “Budget and Schedule” section, you’ll see “Ad Scheduling”. Click “more options”, and when you do, you’ll see that you have ability to run your ad on a schedule or all the time. This can be a very cool feature, because you can tell your ad to only run certain hours of the day by choosing to run on a schedule. In general, ads typically do better after 6AM and before 11PM, so you might want to consider running yours in a similar time frame.
Underneath “Budget and Schedule”, you’ll see “Placement”. Here you’ll just want to select “automatic placements” and let Facebook do it’s thing. After that, you’ll see “Optimization and Delivery”. If you’ve already chosen to run ads to get “link clicks”, then you’re all set. Let Facebook book handle the bid amount, allow to be charged when someone clicks a link, and let Facebook show your ads throughout the day, instead of trying to blitz people.
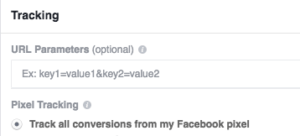 The last piece of creating an ad would be the “Ad” itself. This part of the process is pretty self-explanatory, but what I want to make you aware of is at the bottom of the ad creating page, under “Tracking”. You can track everyone who clicks on your link and then opens whatever you want them to open on your site, or registers for something, etc. Once you track conversions, you can see how much you’re spending per conversion, which will help you better establish your marketing budget. Other than that, you can create the ad the way you like, and then send it out into the world!
Wrap Up. All of this in the beginning can seem very overwhelming and a little intense. Don’t be intimidated. One of the best ways to learn how to use this effectively, is to simply play around with different options within these areas and in no time you'll be a studio marketing expert. Try some things out and keep track of the data to use for future ads. You won’t be able to implement all of this perfectly the first time, so just do your best and make changes based on your data, and have fun!